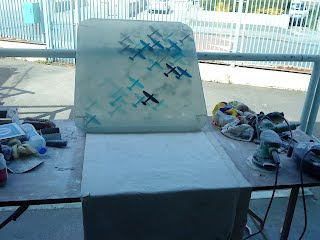
This is the main piece of work for Swab Barcelona.Dimensions are 72 x 72 cm and 6 cm deep, cast in clear resin with cotton wool as clouds and precast spitfires with varying pigments of resin dye.
1. A wooden mould is made and sealed with several layers of shellac, sanded between each application.
2. Vasaline is applied to the mould before the layers of resin are set.
3. I have found that if you are applying several layers of resin the procedure of using a PVC release agent can become complicated. The pvc can become jammed between separate layers of resin.
4. With the vasaline, whit blobs can be embedded in resin after, so it is best to make sure your mould is well mad initially so that you only have to us a thin layer of vasaline. Give yourself a number of weeks to prepare the mould applying six or seven layers of shellac sanded between each application and finally waxed and polished.
Layers of resin were applied in litres - 7,4,4,4,4,4 - 27 litres in total. Try to pour layers before the last layer has completely set. If the layer is allowed to set to much it will shrink slightly pulling away from the sides of the mould and curling slightly.
This is why the first application of seven litres is necessary in one pour. The best cast will be obtained by following this process. This may involve staying in the studio for 24 or 30 hours straight.
Before the last two layers are poured the dowl wood in the corners are cut of simply using a hand saw and precut shellaced wooden corners are set in by screwing through the wood into the down. Make sure that the wood corners are well sealed with shellaced and that the join between the corner wood and the resin is sealed and then the last two layers of resin are applied.
Durine each application of resin the cotton wool and planes are added.
The dyes for casting in resin can look very different when they are mixed with resin so it is best to creat a reference chart of cast pieces indicating the amount of dye used and colour.
Between the casting of each layer cover the mould completely so that no air can get in, this is most important on the last layer
and air or wind will cause a ripple effect on the surface which will involve alot more sanding afterwards.If all prcedures have been followed the cast should release easily from the mould.
Begin sanding the cast resin in.... 120 grain six inch orbital sanding pads velcro backing. Use a powerful good quality makita, hitachi or bosch sanders, domestic sanders won´t last any time.Sanding and polishing could take all combined 10 - 16hours or more it´s really impossible to say exactly. Wear a mask all the time,cover your hair and wear goggles, resin is bad stuff and do as much outside as possible.
After sanding all the surface back sides and front in 120 grain so that the surface is smooth move onto 240 grain and follow the same procedure.The surface should become more transparent at this stage. It is not advisable to do all this work in one go, instead do three or four hours a day,cleaning up the entire area after each session. Working intensely on something like this will burn you out, it´s art your not making a boat. You take away too much of the joy and the experience and it shows in the work, I work on numerous pieces at the same time and that way I am always inspired.
After the 240 move onto 320 and again follow the same procedure. At the end of this stageclean down everything and give everything a good vacuming and was down the resin cast. You now move onto the rest by hand, using 600 grain wet and dry sand paper first , then 1200 and finally 1500 it takes whatever time it takes!!It´s like the karate kid cleaning the glass, wipe on wipe
off.......
class="separator" style="clear: both; text-align: center;">

The surface should be quite clear after hours of cross hatching sanding. The surface is then polished by connecting buffing brushes to the end of a good drill.Apply some buffing wax to the brush a begin sanding small areas lightly in tight circular movments using both hands, I using just one while I take the photos.These are all very traditional art techniques maybe more contemporary in design and the use of power tools but the procedure is what it is and there is no way around it, it´s a combination of contemporary creativity and artisan craft and it takes time.


Comments
Post a Comment